spring boot 官方文件摘要
2015-09-09
Tags: 程式語言 , java , gradle , spring
這篇內容寫的是 spring boot 1.2.5 官方文件 重點摘要,不做 spring boot 基礎教學。要看懂這些內容有下列前題假設
- 會用 java 寫 spring boot 程式
- 會用 gradle 寫 build script
如果你完全不懂 spring boot,建議看一下 Bootify your spring application (投影片)(錄影),看完後會對 spring boot 有基本認知,有助於日後快速上手。
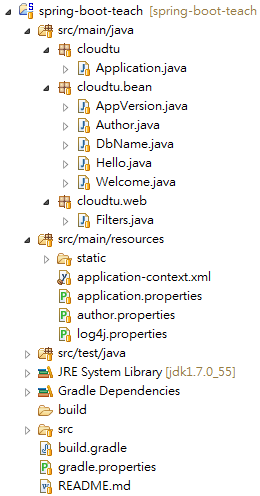
spring-boot-teach 教學程式解說
我針對官方文件寫了個 spring-boot-teach 教學程式 放在 github 上,請把它抓回來看看程式怎麼寫、怎麼運作。此外,這節出現的範列在內容上有前後關係,所以這節內容不要跳著看,不然會發生看完後卻看不懂在講什麼的鳥事
程式目錄結構
application-context.xml
<?xml version="1.0" encoding="UTF-8"?>
<beans xmlns="http://www.springframework.org/schema/beans"
    xmlns:xsi="http://www.w3.org/2001/XMLSchema-instance"
    xmlns:context="http://www.springframework.org/schema/context"
    xsi:schemaLocation="http://www.springframework.org/schema/beans http://www.springframework.org/schema/beans/spring-beans.xsd
                http://www.springframework.org/schema/context http://www.springframework.org/schema/context/spring-context.xsd">

    <bean id="hello" class="cloudtu.bean.Hello"/>
</beans>
這個 spring xml 設定檔會在 java config 時被匯入
application.properties
server.port=8080
# enable Tomcat's HTTP response compression
server.tomcat.compression=on

# set actuator HTTP port
management.port=8081
# 只許可經由內網網址連入 actuator,可避免監控資料外流
management.address=127.0.0.1

welcome.first-message=java run anywhere
welcome.secondMessage=spring boot is easy to use

appVersion=1.0.0

db.prd.name=prd123
db.dev.name=dev456
# 設定要啟用哪些 profile
spring.profiles.active=dev
application.properties 是 spring boot 預設的外部設定檔。因為我針對 actuator 功能設定了 management.port=8081、management.address=127.0.0.1,所以只能用 http://127.0.0.1:8081/${actuator_endpoint} 這類網址才可以取得 actuator 提供的資訊
author.properties
author.name=cloudtu
author.department=RD team
除了 application.properties 之外自訂的設定檔,之後會提供給 author bean 使用
Application.java
package cloudtu;

...etc
import cloudtu.bean.Author;
import cloudtu.bean.DbName;

// @SpringBootApplication = @Configuration + @EnableAutoConfiguration + @ComponentScan
@SpringBootApplication
// 匯入 XML 格式的 spring 設定檔
@ImportResource("classpath:application-context.xml")
// 設定 property file 設定檔的來源位置
@PropertySource("classpath:author.properties")
public class Application {
    ...etc

    // author.properties 裡的 author.* 設定會自動綁定到 authorName, authorDept 變數
    @Value("${author.name}") private String authorName;
    @Value("${author.department}") private String authorDept;

    @Bean
    public Author author(){
        Author author = new Author();
        // 手工指定 author bean 裡的各項 setter 設定
        author.setName(authorName);
        author.setDepartment(authorDept);
        return author;
    }

    @Bean
    // application.properties 裡的 db.prd.* 設定會自動綁定到 prdDbName bean
    @ConfigurationProperties(prefix="db.prd")
    @Profile("prd")
    public DbName prdDbName(){
        return new DbName();
    }

    @Bean
    // application.properties 裡的 db.dev.* 設定會自動綁定到 devDbName bean
    @ConfigurationProperties(prefix="db.dev")
    @Profile("dev")
    public DbName devDbName(){
        return new DbName();
    }

    public static void main(String[] args) {
        ApplicationContext context = SpringApplication.run(Application.class, args);
        ...etc
    }
}
程式碼關鍵處都加了註解,所以看完後你應該知道裡面各個 annotation 用法,不過有儿個地方再補充說明一下。
1. @ConfigurationProperties 可以把 *.property 設定檔的設定值經由各個 bean 的 setter 進行自動綁定動作
2. 在 application.properties 裡設定了 spring.profiles.active=dev,所以程式裡有 @Profile("dev") 宣告的 devDbName bean 在執行時會產生,但是有 @Profile("prd") 宣告的 prdDbName bean 在執行時不會產生
Welcome.java
package cloudtu.bean;

...etc
@Component
// application.properties 裡的 welcome.* 設定會自動綁定到 welcome bean
@ConfigurationProperties(prefix="welcome")
public class Welcome {
    private String firstMessage;
    private String secondMessage;

    // application.properties 裡的 welcome.first-message 設定綁定到 firstMessage instance variable
    public void setFirstMessage(String firstMessage) {
        this.firstMessage = firstMessage;
    }
    // application.properties 裡的 welcome.secondMessage 設定綁定到 secondMessage instance variable
    public void setSecondMessage(String secondMessage) {
        this.secondMessage = secondMessage;
    }
    ...etc
}
這個範例也是在介紹 @ConfigurationProperties 用法,不過你會發現設定檔裡的名稱格式不一致, welcome.first-message 用 - 當變數名稱裡的分隔符號,另一個 welcome.secondMessage 則是用 lower camel case 命名方式。這兩種設定方式 spirng boot 都可以接受
AppVersion.java
package cloudtu.bean;

...etc
@Component
public class AppVersion {
    // application.properties 裡的 appVersion 設定會自動綁定到 appVersion 變數
    @Value("${appVersion}") String appVersion;
    ...etc
}
application.properties 裡的設定可以用 @Value("${appVersion}") 這類的宣告方式直接綁定到 bean 裡面
Filters.java
package cloudtu.web;

...etc
@Configuration
public class Filters{
    ...etc

    // spring boot 預設的 url mapping 是  "/*",所以任何 request 都會經過 firstFilter bean
    @Component
    private static class FirstFilter implements Filter{
        ...etc
    }

    private static class SecondFilter implements Filter{
        ...etc
    }

    @Bean
    public FilterRegistrationBean secondFilter(){
        FilterRegistrationBean registration = new FilterRegistrationBean(new SecondFilter());
        // 改寫掉預設的 url mapping,只有 "/hello" 的 request 會經過 secondFilter bean
        registration.addUrlPatterns("/hello");
        return registration;
    }
}
Filter可以直接加@Component讓它變成 spring 裡的 bean,firstFilter bean 就是這樣宣告。但是這樣宣告 filter 會讓它的 url mapping 固定都是/*- 如果想自定 url mapping,要用
FilterRegistrationBean把Filter給包起來,secondFilter bean 就是在講自訂 url mapping 的寫法
官方文件裡與教學程式相關的章節
- configuration
- 11.3.2 The @EnableAutoConfiguration annotation
- 15.1 Importing additional configuration classes
- 15.2 Importing XML configuration
- 18. Using the @SpringBootApplication annotation
- 23. Externalized Configuration
- 23.2 Accessing command line properties
- 23.3 Application property files
- 23.5 Placeholders in properties
- 23.7 Typesafe Configuration Properties
- 24. Profiles
- 36.1 Understanding auto-configured beans
- Appendix A. Common application properties : 有
application.properties常用參數名稱與用途說明
- web developing
- 9.1 Servlet containers : 有支援的 embedded servlet containers 明細列表
- 26. Developing web applications
- 26.1.1 Spring MVC auto-configuration
- 26.1.4 Static Content
- 26.1.5 Template engines : 有支援的 template engine 清單
- 26.3.1 Servlets and Filters
- 26.3.3 Customizing embedded servlet containers
- 26.3.4 JSP limitations : 有寫 JSP 的人要注意一下 sprint boot 在 JSP 方面的限制
官方範列程式
官方在 github 有放 spring boot 官方範列程式,搞不懂某些功能怎麼用時可以去那邊找找有沒有解答
Testing
官方文件裡較重要相關章節條列如下
監控管理
官方文件裡較重要相關章節條列如下
- 40. Actuator endpoints : 有 actuator endpoints 明細列表
- 41.1 Securing sensitive endpoints
- 41.3 Customizing the management server port
- 44. Metrics
- 44.1 System metrics
- 44.2 DataSource metrics
- 44.3 Tomcat session metrics
- 46. Tracing
Build by gradle
spring-boot-teach 教學程式裡的 build.gradle
buildscript {
    repositories {
        mavenCentral()
    }
    dependencies {
        classpath("org.springframework.boot:spring-boot-gradle-plugin:1.2.5.RELEASE")
    }
}

// 引用 spring boot plugin
apply plugin: "spring-boot"
...etc

configurations {
    providedRuntime

    // spring boot 預設使用 logback 但是我要用 log4j,所以必需把 spring-boot-starter-logging 排除掉
    compile.exclude module: "spring-boot-starter-logging"
}

dependencies {
    compile("org.springframework.boot:spring-boot-starter-web")
    // spring-boot-starter-actuator 提供 "監控 app 運作狀況" 功能
    compile("org.springframework.boot:spring-boot-starter-actuator")
    // 改用 log4j 不用預設的 logback
    compile("org.springframework.boot:spring-boot-starter-log4j")
    ...etc
}
範例解說如下
1. 引用了 spring boot plugin 之後就可以利用它提供的各項專屬 task (e.g. bootRun, bootRepackage) 進行開發
2. spring boot 預設的 log 是 logback,我把它換成了 log4j。因為所有 spring-boot-starter-* 的 pom 都相依於 spring-boot-starter-logging,spring-boot-starter-logging 又相依於 logback,所以要加上 compile.exclude module: "spring-boot-starter-logging" 把所有 pom 裡的 spring-boot-starter-logging 相依都排除掉,不然程式裡的 log 會出現部份相依 logback 部份相依 log4j 的問題
常用的 gradle 指令
gradle bootRun- Run the project with support for auto-detecting main class and reloading static resources
- 直接執行 compile 好的 class,不會打包成 war 或 jar
gradle bootRepackage- Repackage existing JAR and WAR archives so that they can be executed from the command line using 'java -jar'
- 先把程式打包成 executable jar (or war),然後再執行 jar (or war)
官方文件裡較重要相關章節
- 10.1.2 Gradle installation
- 13.4 Starter POMs : 有所有 starter pom 明細列表
- 19.4 Using the Gradle plugin
- 59.1 Including the plugin
- 59.2 Declaring dependencies without versions
- 59.4 Packaging executable jar and war files
- 59.5 Running a project in-place
‘How-to’ guides
官方文件有列出常見問題與解答,下列儿項是我目前比較會遇到的項目
- 63.4 Use YAML for external properties
- 64.1 Add a Servlet, Filter or ServletContextListener to an application
- 64.6 Configure SSL
- 64.8 Enable Multiple Connectors with Tomcat
- 64.9 Use Tomcat behind a front-end proxy server
- 64.10 Use Jetty instead of Tomcat
- 64.18.1 Enable Tomcat’s HTTP response compression
- 65.2 Write an XML REST service
- 66.2 Configure Log4j for logging
- 67.2 Configure Two DataSources
- 70.2 Customize the ‘whitelabel’ error page
- 71.3 Enable HTTPS when running behind a proxy server
- 72.2 Reload Thymeleaf templates without restarting the container
- 74.1 Create a deployable war file